🧠 From Zero to Video Call: A Practical Introduction to WebRTC by Harikrashna Parikh on August 3, 2026 825 views

In an age where video calls, live chats, and screen sharing have become everyday experiences, WebRTC is the unsung hero behind many of these technologies. If you’ve ever used Google Meet, Discord, or even some telecommunication platforms—chances are, you’ve already benefited from WebRTC.
In this blog, we’ll explore:
- What WebRTC is
- Why it’s powerful
- How it works
- How you can build your own real-time communication apps using it
🚀 What is WebRTC?
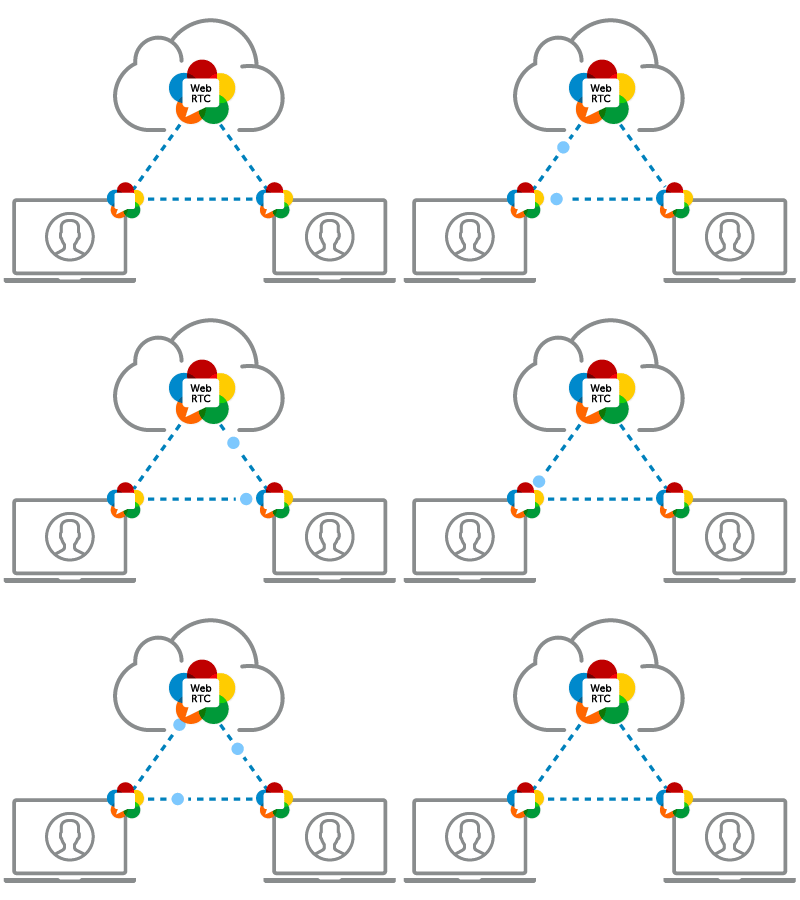
WebRTC (Web Real-Time Communication) is an open-source project that enables real-time audio, video, and data communication between browsers and devices—without requiring plugins or external software.
It operates peer-to-peer, meaning data doesn’t always need to pass through a centralized server. This makes communication faster, more private, and more efficient.
✨ Why Use WebRTC?
- 🔒 Secure – Uses DTLS and SRTP encryption by default
- 🔁 Real-time and low-latency communication
- 🔌 No installations or plugins required
- 🌐 Cross-platform and supported by all modern browsers
📡 Where WebRTC Can Be Used (With Examples)
- Telecommunications – Voice/video calling, messaging apps
- Customer Support – Live chat, browser-based video support
- Healthcare (Telemedicine) – Remote consultations, virtual care
- Education – Online classes, tutoring, webinars
- Media & Broadcasting – Live streaming, interactive shows
- Gaming – In-game voice/video chat, real-time data exchange
- E-commerce – Live shopping, customer interaction
- IoT & Smart Devices – Real-time control and streaming
🧠 Key WebRTC Terminologies Explained
Before implementation, let’s clarify some core WebRTC concepts:
- Peer Connection
- RTCPeerConnection connects two clients to stream audio, video, or data directly.
- ICE (Interactive Connectivity Establishment)
- Helps create a connection, even across NATs or firewalls.
- STUN (Session Traversal Utilities for NAT)
- Helps a device discover its public IP address to establish peer connections.
- TURN (Traversal Using Relays around NAT)
- Acts as a relay when direct peer-to-peer fails due to strict NAT/firewalls.
- SDP (Session Description Protocol)
- Used to negotiate media capabilities between clients by exchanging offers and answers.
- Signaling
- Not defined by WebRTC. Developers use tools like WebSocket, Socket.IO, or Firebase to exchange SDP/ICE messages.
🔄 WebRTC Connection Overview: Step-by-Step Flow
Whether you’re building a video chat app or a screen-sharing tool, here’s what happens under the hood:
🧭 Step-by-Step Overview
- Users A & B open the app (browser/mobile).
- Each requests access to camera and microphone (getUserMedia).
- Browser prompts for camera/mic permissions.
- A signaling channel is established (WebSocket, Socket.IO, Firebase, etc.).
- User A creates an “offer” describing media setup (e.g., codecs, audio/video).
- The offer is sent via signaling to User B.
- User B creates an “answer”, acknowledging accepted media settings.
- ICE candidates are exchanged.
- WebRTC tries to connect:
- Directly (via STUN)
- Or relayed (via TURN)
- 🎉 Connection established: Audio/video/data flows directly between peers.
🪜 Flutter WebRTC: Connection Flow Explained (Step-by-Step)
📦 Flutter Dependencies
dependencies:
  flutter:
    sdk: flutter

  # WebRTC plugin for real-time audio/video
  flutter_webrtc: ^1.5.2

  # WebSocket  for signaling
  web_socket_channel: ^3.0.3
🔹 Step 1: Initialize Camera & Microphone
Request permission and display the local feed:
await localRenderer.initialize();
final mediaConstraints = {'audio': true, 'video': true};
_localStream = await navigator.mediaDevices.getUserMedia(mediaConstraints);
localRenderer.srcObject = _localStream;
💡 Equivalent to getUserMedia in the browser.
🔹 Step 2: Connect to the Signaling Server
Establish WebSocket to exchange metadata:
channel = WebSocketChannel.connect(Uri.parse('ws://localhost:8080/api/videochat/$roomId'));

channel.stream.listen((message) => handleSignalingMessage(message));

channel.sink.add(jsonEncode({"type": "joined"}));
💡 Signaling helps peers discover each other and coordinate setup.
🔹 Step 3: Create and Setup PeerConnection
Configure STUN/TURN servers:
_rtcPeerConnection = await createPeerConnection({
      "iceServers": [
        {"urls": "stun:stun.l.google.com:19302"},
        // More TURN servers here
      ],
    });

    _localStream?.getTracks().forEach((track) {
      _rtcPeerConnection?.addTrack(track, _localStream!);
    });
💡 This allows NAT traversal and sets up media sharing.
🔹 Step 4: Handle Incoming Signaling Messages
React to signaling types:
void handleSignalingMessage(dynamic message) {
  switch (decoded['type']) {
    case 'joined': _createOffer(); break;
    case 'offer': _onOffer(decoded); break;
    case 'answer': _onAnswer(decoded); break;
    case 'candidate': _onCandidate(decoded); break;
    // More handlers...
  }
}
💡 This is the heart of dynamic negotiation.
🔹 Step 5: Create Offer and Answer
Initiator sends offer → receiver responds:
// Create offer
RTCSessionDescription offer = await _rtcPeerConnection!.createOffer();
await _rtcPeerConnection!.setLocalDescription(offer);
channel.sink.add(jsonEncode(offer.toMap()));

// Handle incoming offer and send answer
await _rtcPeerConnection?.setRemoteDescription(
  RTCSessionDescription(message['sdp'], message['type']),
);
RTCSessionDescription answer = await _rtcPeerConnection!.createAnswer();
await _rtcPeerConnection?.setLocalDescription(answer);
channel.sink.add(jsonEncode(answer.toMap()));
💡 This is the SDP negotiation phase — think of it like a media contract.
🔹 Step 6: Exchange ICE Candidates
Both peers send ICE candidates via signaling:
_rtcPeerConnection?.onIceCandidate = (RTCIceCandidate candidate) {
  channel.sink.add(jsonEncode(IceCandidateWrapper(candidate: candidate).toMap()));
};

RTCiceCandidate candidate = RTCIceCandidate(
  message['candidate']['candidate'],
  message['candidate']['sdpMid'],
  message['candidate']['sdpMLineIndex'],
);
_rtcPeerConnection?.addCandidate(candidate);
💡 ICE helps find the best network route for the connection.
🔹 Step 7: Render Remote Video
Display remote peer’s stream:
_rtcPeerConnection?.onTrack = (event) {
  if (event.streams.isNotEmpty) {
    remoteRenderer.srcObject = event.streams[0];
  }
};
💡 Matches the browser’s ontrack event.
✅ Experience It Yourself!
Experience a full, simple demo implementation of a WebRTC video calling app using:
- Signaling Server: Java Spring Boot
- Client UI: Dart & Flutter framework
🚀 GitHub Repo: Flutter-Webrtc-Websocket
🧹 Optional: Toggle Mic, Camera, and End Call
You’ve built awesome utilities:
- Mute/unmute mic (toggleMic)
- Pause/resume video (toggleVideo)
- Switch camera (toggleCamera)
- End call and clean resources (endCall, _stop)
⚠️ Common Pitfalls and Best Practices
🔒 NAT & Firewall Issues
- Use STUN + TURN together
- TURN is vital for strict networks (corporate, LTE)
🌐 Browser Compatibility
- Supported by Chrome, Firefox, Safari, Edge
- Always test across devices and platforms
📱 Mobile Considerations
- Use flutter-webrtc or react-native-webrtc
- Native platforms need additional setup
🔐 Security
- Use HTTPS for getUserMedia
- Use WSS and encrypted tokens for secure signaling
🚧 WebRTC Peer Limitation & Scalable Solutions
🤝 Direct P2P = Best for Small Groups
- Ideal for 2 to 4 users
- Mesh networks don’t scale well (bandwidth grows fast)
🧮 Quick Bandwidth Example:
For N users, each user sends (N – 1) video streams.
- 3 users → 3×2 = 6 connections total
- 5 users → 5×4 = 20 connections total
- 10 users → 10×9 = 90 connections total 😨
👉 This becomes unsustainable on most client networks.
✅ Use SFU (Selective Forwarding Unit) for Scale
- All users connect to a central media server (SFU)
- Each user sends media once
- SFU forwards streams to all participants
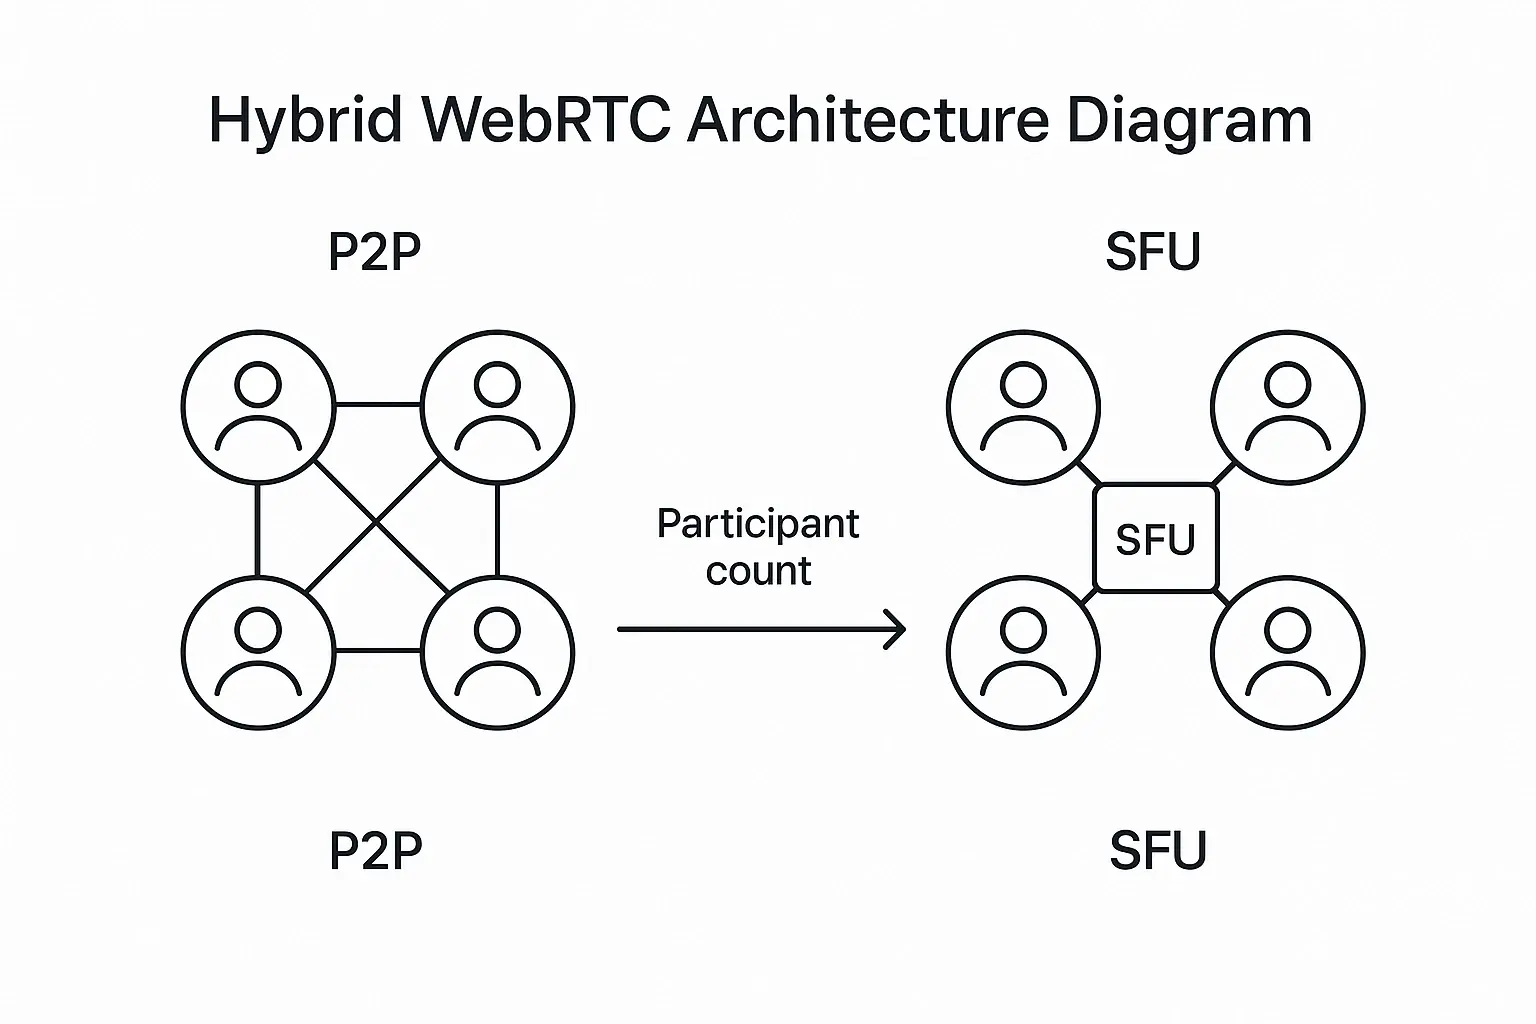
Benefits of SFU:
- Reduces client-side bandwidth
- Supports 10–100+ users
Popular SFU tools:
- mediasoup
- Janus
- Jitsi Videobridge
- livekit.io
📚 Helpful Resources
- 🌐 WebRTC.org
- 📘 MDN WebRTC Guide
- 🔧 TURN/STUN Services: Twilio, Xirsys
- 🚀 GitHub Repo: Flutter-Webrtc-Websocket
🧩 Final Thoughts
WebRTC brings the future of real-time communication to your browser. Whether you’re building a video chat, a multiplayer game, or a live support tool, WebRTC is a powerful part of your developer toolkit.
Start small—try building a video chat or shared whiteboard. Once you understand signaling and media streams, the possibilities are endless.
Happy coding!
🎥📡
About Author